

How To Repair A Roofing Shingle
Like shooting fish in a barrel Shingle Repair
Updated: Jun. thirty, 2022
Fix those potential leaks now.
Remove those ugly damaged shingles and finish potential roof leaks by post-obit this simple three-step shingle replacement process.
You might also similar: TBD
Replace damaged shingles

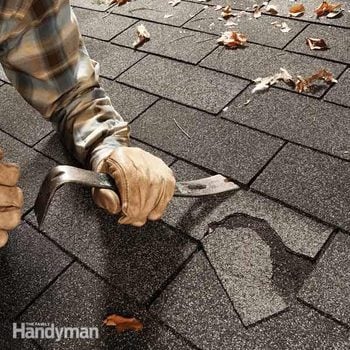
Photo one: Pry gently to break shingle free
Gently tap a flat bar under the shingles to break the seal-down strips free. Don't force it—shingles rip easily.

Strip out photo of unmarried shingle showing nail locations
Find all viii nails in these typical locations.

Photograph 2: Pry up shingle and nail together
Wedge the notch of the pry bar under the shingle at the nail head, then pry upwardly both shingle and blast.

Photo 3: Nail on the new shingle
Boom downward the new shingle, propping the tabs above as you lot nail to avoid breaking them.
A broken shingle is both ugly and a leak waiting to happen. But every bit long as you can find matching shingles (and yous're not afraid of heights), the repair is straightforward.
Choice a mean solar day when the weather is moderate to do the repair—too cold and the shingles can crack; also warm and the shingle sealants are tough to break.
Loosen the tabs under the broken shingle and the adjacent two courses in a higher place it (Photograph 1). Shingles are attached with 8 nails each—four at the middle only higher up the tab slots and four through the shingle above it—and you accept to elevator upward all the shingles that cover those nails to remove them.
After all the tabs are loose, push the apartment bar up under the damaged shingle to each boom, centering the nail in the flat bar notch (Photo 2). To avoid ripping shingles, gently work the pry bar under both tabs equally you push it up.
Pop out the nails by prying underneath the shingle instead of trying to dig the smash head out from the top of the shingle; that volition wreck the shingle. So button the shingle downwards from the nail head and pull out the nail. Afterward removing the eye row of nails on the damaged shingle, lift the undamaged shingles above information technology and remove the next row of nails. And then pull out the damaged shingle.
Slide the new shingle up into place. Boom the center row first, then the center row of the grade above information technology, nailing i/2 in. over from the former holes (Photograph iii). Nail at the elevation of the slots between the tabs, just above the sealant strip.
Required Tools for this Project
Have the necessary tools for this DIY projection lined upwards earlier y'all start—you'll salvage fourth dimension and frustration.
Required Materials for this Project
Avoid last-infinitesimal shopping trips by having all your materials fix ahead of time. Hither's a list.
Originally Published: June 20, 2022

How To Repair A Roofing Shingle,
Source: https://www.familyhandyman.com/project/easy-shingle-repair/
Posted by: cutrerserot1974.blogspot.com
0 Response to "How To Repair A Roofing Shingle"
Post a Comment